Images lab
This is a lab activity, not an assignment. Therefore, it's not required that you complete it or hand it in. However, the concepts in this lab will be useful for completing the homework assignments (and will be useful for exams down the road), so I'd encourage you to put in a serious effort on it in class, and to consider finishing any remaining parts outside of class.
Goals: Practice using nested lists and iteration. Prepare for the next homework assignment where you'll be doing similar activities.
Setup
Log into a lab computer, mount COURSES, and navigate to your STUWORK directory. Look back at the lab from the first day of class or get help from Anna or Rachel if you need a reminder on how to complete these steps.
Create a folder in your STUWORK directory called imagesLab. Open VSCode, and drag the imagesLab folder
into the VSCode window. Download the
starter code
and move all files into your new folder.
The download should include two Python files, imageLab.py and cImage.py, as well as three sample images.
One additional setup note: if you're running this on your own computer after class, you might need to install a library called pillow. You can do so with the following command in terminal:
pip3 install pillow
If that doesn't work, try pip install pillow. If that still doesn't work, reach out for help and in the meantime
work on one of the lab computers that already has pillow installed.
Part 1: Image modification
This section describes the actions you should take with the code; while programming, you may also find it useful to read the section further down in the document where I summarize functions that might be helpful to use.
Familiarize yourself with the code
Start by reading through the code that is already in imageLab.py. I've defined a function testFilter that
is similar to what I showed you in class where we removed blue from an image, but this function also allows you
to pass in the name of the function that you want to use to transform the image.
Run the starter code
Run the starter code by typing python3 imageLab.py in the terminal. Note that you have to click the images (not
the red x in the corner) that popup to have the code continue executing.
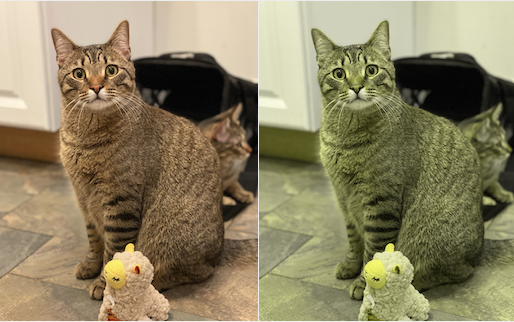
Complete the function colorBlind
This function will take in one parameter (a Python image object) and return a new Python image object that has been modified to be an approximation of what a person with red-green colorblindness might see. To do this, every pixel in the original image needs to be modified so that the red and green pixel values are averaged together. For example, if the original image had a pixel with the (r, g, b) values (100, 20, 80), the corresponding pixel in the new image will have an (r, g, b) value of (60, 60, 80).
- Note #1: you'll want to make sure that the pixel values you use are integers.
The
roundfunction will be helpful for this. - Note #2: it might be helpful to create a helper function that accepts a Pixel object as a parameter and returns a new pixel with the appropriate modifications.
After completing colorBlind, you should get an output like this:
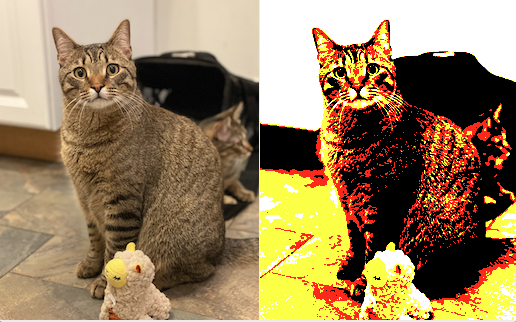
Complete the function contrast
This funciton will take in one parameter (a Python image object) and return a new Python image object that has been modified to have increased contrast. Do this by following these steps: for each original pixel, get the original red, green, and blue values. Create a new pixel where each original color value that was less than or equal to 127 is set to 0, and each color value that was greater than or equal to 128 is set to 255. For instance, if the pixel had (r, g, b) values of (127, 128, 128), the new color values would be (0, 255, 255). Again, you may find it useful to define additional functions while doing this.
After completing contrast, you should get an output like this:
Helpful image functions, summarized
These functions can be applied to Image objects and may be helpful when writing your code.
getHeight(no parameters): returns an integer representing how tall the image is, i.e., the number of rows of pixels in the image.getWidth(no parameters): returns an integer representing how wide the image is, i.e., the number of columns of pixels in the image.getPixel(two parameters: column (int) and row (int)): returns a reference to the pixel object at coorindates (column, row). E.g., if column=2 and row=0, this would return the pixel in the top row, three pixels from the left.setPixel(three parameters: column (int), row (int), and pixel (Pixel object)): set the pixel at coordinates (column, row) to the given pixel. Helpful for when you've modified a copy of a pixel and want to place that modified pixel into the new image.
There are also some functions that can be Pixel objects that may be useful.
getRed(no parameters): returns the integer in [0, 255] representing the level of red in the pixel.getGreen(no parameters): returns the integer in [0, 255] representing the level of green in the pixel.getBlue(no parameters): returns the integer in [0, 255] representing the level of blue in the pixel.
Part 2: More loop practice
Here are some more exercises to practice using nested loops and while loops. For each of these, I recommend writing the solution paper before typing it up and testing it. We'll go through the solutions to these in class on Friday, so please try them before then.
Use nested loops to write a snippet of code that will print the following pattern to the screen:
*
**
***
****
*****
Use nested loops to write a snippet of code that will print the following to the screen:
012345
123456
234567
345678
Write a function called
multiplicationthat will compute and print a multiplication table nested loops. You should print 5 rows and 5 columns (but feel free to make your function more advanced by having it accept parameters indicating how many rows and columns to print). I.e.,1 2 3 4 5 2 4 6 8 10 3 6 9 12 15 4 8 12 15 18 5 10 15 20 25
Note: you'll want to use the
print()function, but instead of printing a newline at the end, you may want to print a tab. You can do that with the following syntax:print(1, end='\t') where'\t'is the newline character.What will be the output of each of the following code snippets?
a.
i = 9
while i > 0:
    print(i)
    i -= 2
print(f"After loop, i is {i}")
b.
for i in range(4):
    j = 0
    while j <= i:
        print(i, j)
        j = j + 1
    print()
Anna's acknowledgements
This lab was adapted from labs used by Anna Rafferty and Layla Oesper. Thanks for sharing!